
AutoMQ Load
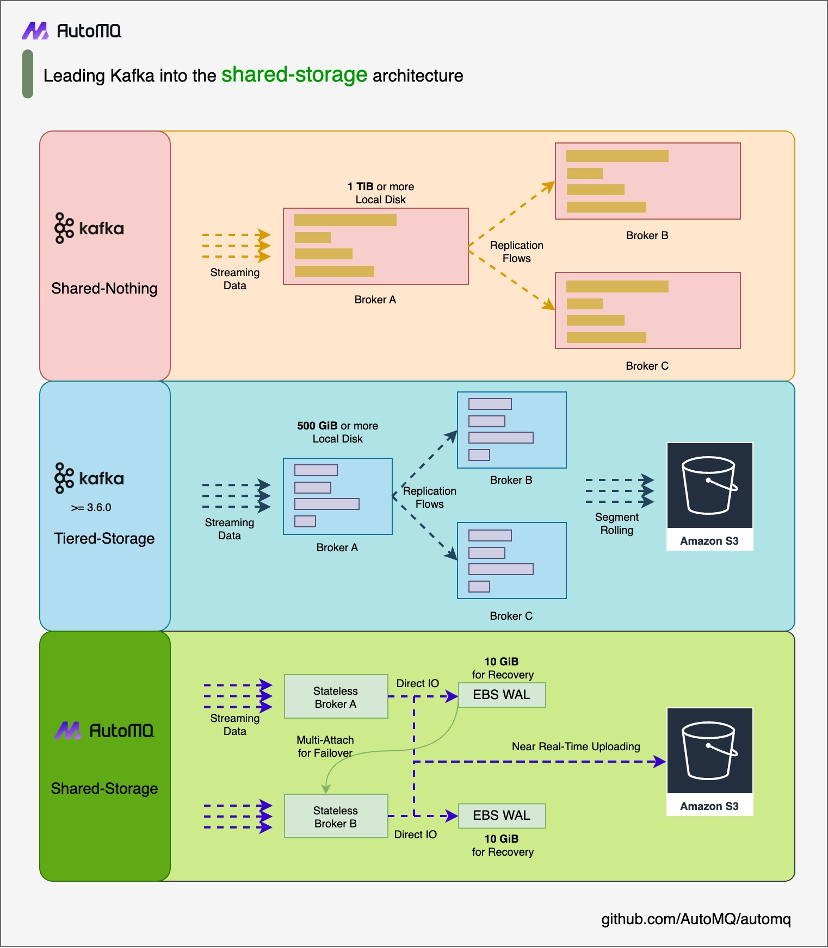
AutoMQ is a cloud-native fork of Kafka by separating storage to object storage like S3. It remains 100% compatible with Apache Kafka® while offering users up to a 10x cost-effective and 100x elasticity . Through its innovative shared storage architecture, it achieves capabilities such as reassign partitions in seconds, self-balancing and auto scaling in seconds while ensuring high throughput and low latency.
This article will explain how to use Apache Doris Routine Load to import data from AutoMQ into Doris. For more details on Routine Load, please refer to the Routine Load document.
Environment Preparation
Prepare Apache Doris and Test Data
Ensure that a working Apache Doris cluster is already set up. For demonstration purposes, we have deployed a test Apache Doris environment on Linux following the Deploying with Docker document. Create databases and test tables:
create database automq_db;
CREATE TABLE automq_db.users (
                                 id bigint NOT NULL,
                                 name string NOT NULL,
                                 timestamp string NULL,
                                 status string NULL

) DISTRIBUTED BY hash (id) PROPERTIES ('replication_num' = '1');
Prepare Kafka Command Line Tools
Download the latest TGZ package from AutoMQ Releases and extract it. Assuming the extraction directory is AUTOMQ_HOME/bin to create topics and generate test data.
Prepare AutoMQ and test data
Refer to the AutoMQ official deployment documentation to deploy a functional cluster, ensuring network connectivity between AutoMQ and Apache Doris. Quickly create a topic named example_topic in AutoMQ and write a test JSON data to it by following these steps.
Create Topic
Use the Apache Kafka® command line tool in AutoMQ to create the topic, ensuring that you have access to a Kafka environment and that the Kafka service is running. Here is an example command to create a topic:
$AUTOMQ_HOME/bin/kafka-topics.sh --create --topic exampleto_topic --bootstrap-server 127.0.0.1:9092 --partitions 1 --replication-factor 1
Tips: When executing the command, replace
topicandbootstarp-serverwith the actual AutoMQ Bootstrap Server address.
After creating the topic, you can use the following command to verify that the topic has been successfully created.
$AUTOMQ_HOME/bin/kafka-topics.sh --describe example_topic --bootstrap-server 127.0.0.1:9092
Generate test data
Create a JSON-formatted test data entry, corresponding to the table mentioned earlier.
{
  "id": 1,
  "name": "testuser",
  "timestamp": "2023-11-10T12:00:00",
  "status": "active"
}
Write test data
Use Kafka's command-line tools or a programming approach to write the test data to a topic named example_topic. Below is an example using the command-line tool:
echo '{"id": 1, "name": "testuser", "timestamp": "2023-11-10T12:00:00", "status": "active"}' | sh kafka-console-producer.sh --broker-list 127.0.0.1:9092 --topic example_topic
To view the data just written to the topic, use the following command:
sh $AUTOMQ_HOME/bin/kafka-console-consumer.sh --bootstrap-server 127.0.0.1:9092 --topic example_topic --from-beginning
Tips: When executing the command, replace
topicandbootstarp-serverwith the actual AutoMQ Bootstrap Server address.
Create a Routine Load import job
In the Apache Doris command line, create a Routine Load job that accepts JSON data to continuously import data from an AutoMQ Kafka topic. For detailed parameter information of Routine Load, please refer to [Doris Routine Load].
CREATE ROUTINE LOAD automq_example_load ON users
COLUMNS(id, name, timestamp, status)
PROPERTIES
(
    "format" = "json",
    "jsonpaths" = "[\"$.id\",\"$.name\",\"$.timestamp\",\"$.status\"]"
 )
FROM KAFKA
(
    "kafka_broker_list" = "127.0.0.1:9092",
    "kafka_topic" = "example_topic",
    "property.kafka_default_offsets" = "OFFSET_BEGINNING"
);
Tips: When executing the command, you need to replace kafka_broker_list with the actual AutoMQ Bootstrap Server address.
Verify data import
First, check the status of the Routine Load import job to ensure that the task is running.
show routine load\G;
Then query the relevant tables in the Apache Doris database, and you will see that the data has been successfully imported.
select * from users;
+------+--------------+---------------------+--------+
| id   | name         | timestamp           | status |
+------+--------------+---------------------+--------+
|    1 | testuser     | 2023-11-10T12:00:00 | active |
|    2 | testuser     | 2023-11-10T12:00:00 | active |
+------+--------------+---------------------+--------+
2 rows in set (0.01 sec)