Broker Load
Why introduce Broker Load?
Stream Load is a push-based method, where the data to be imported relies on the client to read and push it to Doris. Broker Load, on the other hand, involves sending an import request to Doris, and Doris actively pulls the data. Therefore, if the data is stored in systems like HDFS or object storage, using Broker Load is the most convenient. This way, the data doesn't need to pass through the client but is directly read and imported by Doris.
Direct reads from HDFS or S3 can also be imported through HDFS TVF or S3 TVF in the Lakehouse/TVF. The current "Insert Into" based on TVF is a synchronous import, while Broker Load is an asynchronous import method.
Broker Load is suitable for scenarios where the source data is stored in remote storage systems, such as HDFS, and the data volume is relatively large.
Basic Principles
After a user submits an import task, the Frontend (FE) generates a corresponding plan. Based on the current number of Backend (BE) nodes and the size of the file, the plan is distributed to multiple BE nodes for execution, with each BE node handling a portion of the import data.
During execution, the BE nodes pull data from the Broker, perform necessary transformations, and then import the data into the system. Once all BE nodes have completed the import, the FE makes the final determination on whether the import was successful.
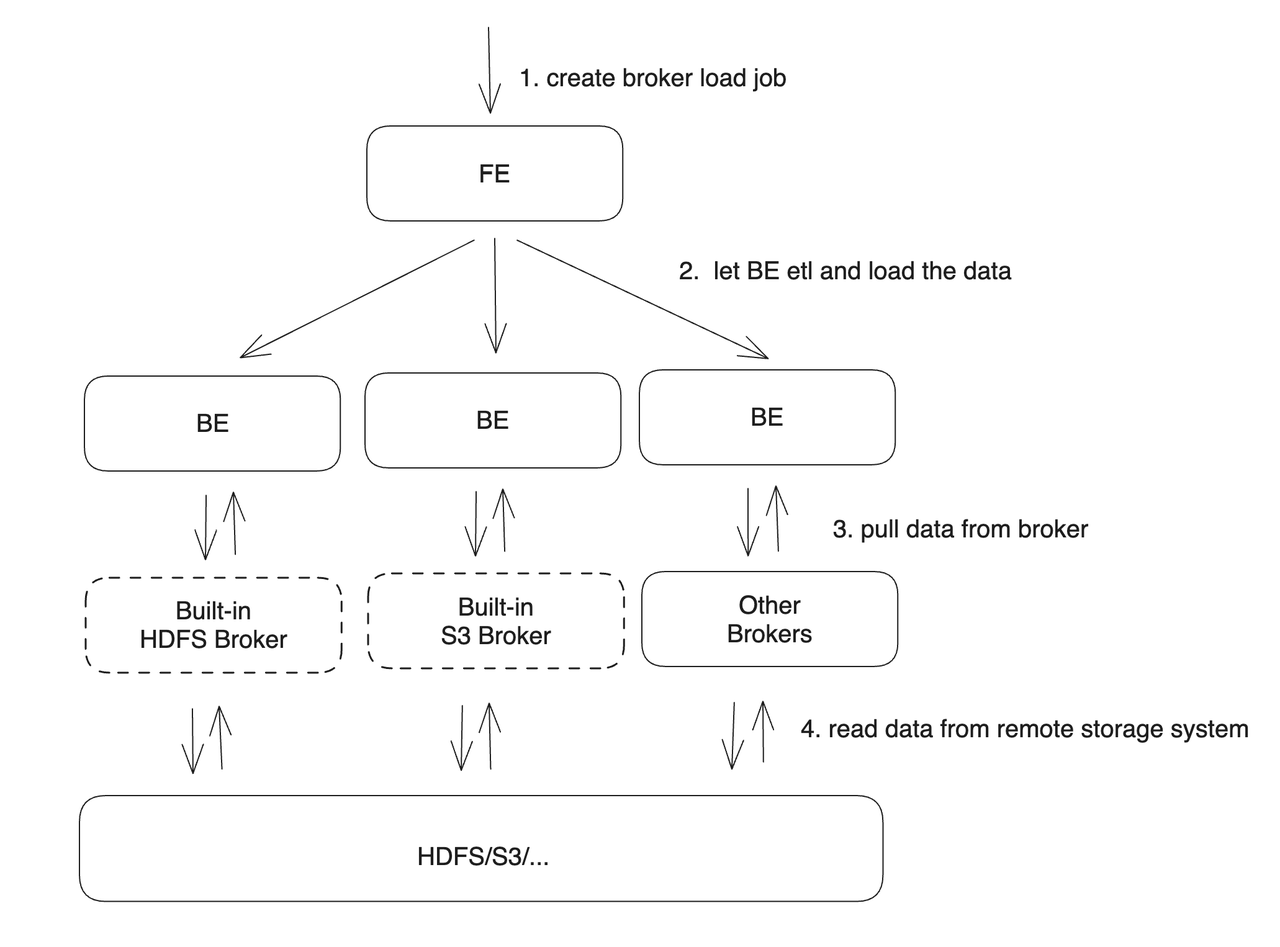
As seen in the diagram, BE nodes rely on Broker processes to read data from corresponding remote storage systems. The introduction of Broker processes primarily aims to accommodate different remote storage systems. Users can develop their own Broker processes according to established standards. These Broker processes, which can be developed using Java, offer better compatibility with various storage systems in the big data ecosystem. The separation of Broker processes from BE nodes ensures error isolation between the two, enhancing the stability of the BE.
Currently, BE nodes have built-in support for HDFS and S3 Brokers. Therefore, when importing data from HDFS or S3, there is no need to additionally start a Broker process. However, if a customized Broker implementation is required, the corresponding Broker process needs to be deployed.
SQL syntax for importing
LOAD LABEL load_label
(
data_desc1[, data_desc2, ...]
)
WITH [HDFS|S3|BROKER broker_name]
[broker_properties]
[load_properties]
[COMMENT "comments"];
For the specific syntax for usage, please refer to BROKER LOAD in the SQL manual.
Checking import status
Broker Load is an asynchronous import method, and the specific import results can be viewed through the SHOW LOAD command.
mysql> show load order by createtime desc limit 1\G;
*************************** 1. row ***************************
         JobId: 41326624
         Label: broker_load_2022_04_15
         State: FINISHED
      Progress: ETL:100%; LOAD:100%
          Type: BROKER
       EtlInfo: unselected.rows=0; dpp.abnorm.ALL=0; dpp.norm.ALL=27
      TaskInfo: cluster:N/A; timeout(s):1200; max_filter_ratio:0.1
      ErrorMsg: NULL
    CreateTime: 2022-04-01 18:59:06
  EtlStartTime: 2022-04-01 18:59:11
 EtlFinishTime: 2022-04-01 18:59:11
 LoadStartTime: 2022-04-01 18:59:11
LoadFinishTime: 2022-04-01 18:59:11
           URL: NULL
    JobDetails: {"Unfinished backends":{"5072bde59b74b65-8d2c0ee5b029adc0":[]},"ScannedRows":27,"TaskNumber":1,"All backends":{"5072bde59b74b65-8d2c0ee5b029adc0":[36728051]},"FileNumber":1,"FileSize":5540}
1 row in set (0.01 sec)
Cancelling an Import
When the status of a Broker Load job is not CANCELLED or FINISHED, it can be manually cancelled by the user. To cancel, the user needs to specify the label of the import task to be cancelled. The syntax for the cancel import command can be viewed by executing CANCEL LOAD.
For example: To cancel the import job with the label "broker_load_2022_03_23" on the DEMO database.
CANCEL LOAD FROM demo WHERE LABEL = "broker_load_2022_03_23";
HDFS Load
Simple Authentication
Simple authentication refers to the configuration of Hadoop where hadoop.security.authentication is set to "simple".
(
    "username" = "user",
    "password" = ""
);
The username should be configured as the user to be accessed, and the password can be left blank.
Kerberos Authentication
This authentication method requires the following information:
hadoop.security.authentication: Specifies the authentication method as Kerberos.
hadoop.kerberos.principal: Specifies the Kerberos principal.
hadoop.kerberos.keytab: Specifies the file path of the Kerberos keytab. The file must be an absolute path on the server where the Broker process is located and must be accessible by the Broker process.
kerberos_keytab_content: Specifies the content of the Kerberos keytab file after being encoded in base64. This can be used as an alternative to the kerberos_keytab configuration.
Example configuration:
(
    "hadoop.security.authentication" = "kerberos",
    "hadoop.kerberos.principal" = "doris@YOUR.COM",
    "hadoop.kerberos.keytab" = "/home/doris/my.keytab"
)
(
    "hadoop.security.authentication" = "kerberos",
    "hadoop.kerberos.principal" = "doris@YOUR.COM",
    "kerberos_keytab_content" = "ASDOWHDLAWIDJHWLDKSALDJSDIWALD"
)
To use Kerberos authentication, the krb5.conf (opens new window) file is required. The krb5.conf file contains Kerberos configuration information. Typically, the krb5.conf file should be installed in the /etc directory. You can override the default location by setting the KRB5_CONFIG environment variable. An example of the krb5.conf file content is as follows:
[libdefaults]
    default_realm = DORIS.HADOOP
    default_tkt_enctypes = des3-hmac-sha1 des-cbc-crc
    default_tgs_enctypes = des3-hmac-sha1 des-cbc-crc
    dns_lookup_kdc = true
    dns_lookup_realm = false

[realms]
    DORIS.HADOOP = {
        kdc = kerberos-doris.hadoop.service:7005
    }
HDFS HA Mode
This configuration is used to access HDFS clusters deployed in HA (High Availability) mode.
dfs.nameservices: Specifies the name of the HDFS service, which can be customized. For example: "dfs.nameservices" = "my_ha".
dfs.ha.namenodes.xxx: Customizes the names of the namenodes, with multiple names separated by commas. Here, xxx represents the custom name specified in dfs.nameservices. For example: "dfs.ha.namenodes.my_ha" = "my_nn".
dfs.namenode.rpc-address.xxx.nn: Specifies the RPC address information for the namenode. In this context, nn represents the namenode name configured in dfs.ha.namenodes.xxx. For example: "dfs.namenode.rpc-address.my_ha.my_nn" = "host:port".
dfs.client.failover.proxy.provider: Specifies the provider for client connections to the namenode. The default is org.apache.hadoop.hdfs.server.namenode.ha.ConfiguredFailoverProxyProvider.
An example configuration is as follows:
(
    "fs.defaultFS" = "hdfs://my_ha",
    "dfs.nameservices" = "my_ha",
    "dfs.ha.namenodes.my_ha" = "my_namenode1, my_namenode2",
    "dfs.namenode.rpc-address.my_ha.my_namenode1" = "nn1_host:rpc_port",
    "dfs.namenode.rpc-address.my_ha.my_namenode2" = "nn2_host:rpc_port",
    "dfs.client.failover.proxy.provider" = "org.apache.hadoop.hdfs.server.namenode.ha.ConfiguredFailoverProxyProvider"
)
HA mode can be combined with the previous two authentication methods for cluster access. For example, accessing HA HDFS through simple authentication:
(
    "username"="user",
    "password"="passwd",
    "fs.defaultFS" = "hdfs://my_ha",
    "dfs.nameservices" = "my_ha",
    "dfs.ha.namenodes.my_ha" = "my_namenode1, my_namenode2",
    "dfs.namenode.rpc-address.my_ha.my_namenode1" = "nn1_host:rpc_port",
    "dfs.namenode.rpc-address.my_ha.my_namenode2" = "nn2_host:rpc_port",
    "dfs.client.failover.proxy.provider" = "org.apache.hadoop.hdfs.server.namenode.ha.ConfiguredFailoverProxyProvider"
)
Import Example
Importing TXT Files from HDFS
LOAD LABEL demo.label_20220402
(
    DATA INFILE("hdfs://host:port/tmp/test_hdfs.txt")
    INTO TABLE `load_hdfs_file_test`
    COLUMNS TERMINATED BY "\t"
    (id,age,name)
)
with HDFS
(
  "fs.defaultFS"="hdfs://host:port",
  "hadoop.username" = "user"
)
PROPERTIES
(
    "timeout"="1200",
    "max_filter_ratio"="0.1"
);
HDFS requires the configuration of NameNode HA (High Availability)
LOAD LABEL demo.label_20220402
(
    DATA INFILE("hdfs://hafs/tmp/test_hdfs.txt")
    INTO TABLE `load_hdfs_file_test`
    COLUMNS TERMINATED BY "\t"
    (id,age,name)
)
with HDFS
(
    "hadoop.username" = "user",
    "fs.defaultFS"="hdfs://hafs",
    "dfs.nameservices" = "hafs",
    "dfs.ha.namenodes.hafs" = "my_namenode1, my_namenode2",
    "dfs.namenode.rpc-address.hafs.my_namenode1" = "nn1_host:rpc_port",
    "dfs.namenode.rpc-address.hafs.my_namenode2" = "nn2_host:rpc_port",
    "dfs.client.failover.proxy.provider.hafs" = "org.apache.hadoop.hdfs.server.namenode.ha.ConfiguredFailoverProxyProvider"
)
PROPERTIES
(
    "timeout"="1200",
    "max_filter_ratio"="0.1"
);
Importing data from HDFS using wildcards to match two batches of files and importing them into two separate tables
LOAD LABEL example_db.label2
(
    DATA INFILE("hdfs://host:port/input/file-10*")
    INTO TABLE `my_table1`
    PARTITION (p1)
    COLUMNS TERMINATED BY ","
    (k1, tmp_k2, tmp_k3)
    SET (
        k2 = tmp_k2 + 1,
        k3 = tmp_k3 + 1
    )
    DATA INFILE("hdfs://host:port/input/file-20*")
    INTO TABLE `my_table2`
    COLUMNS TERMINATED BY ","
    (k1, k2, k3)
)
with HDFS
(
  "fs.defaultFS"="hdfs://host:port",
  "hadoop.username" = "user"
);
To import two batches of files matching the wildcards file-10* and file-20* from HDFS and load them into two separate tables my_table1 and my_table2. In this case, my_table1 specifies that the data should be imported into partition p1, and the values in the second and third columns of the source files should be incremented by 1 before being imported.
Import a batch of data from HDFS using wildcards
LOAD LABEL example_db.label3
(
    DATA INFILE("hdfs://host:port/user/doris/data/*/*")
    INTO TABLE `my_table`
    COLUMNS TERMINATED BY "\\x01"
)
with HDFS
(
  "fs.defaultFS"="hdfs://host:port",
  "hadoop.username" = "user"
);
To specify the delimiter as the commonly used default delimiter for Hive, which is \x01, and to use the wildcard character * to refer to all files in all directories under the data directory.
Import Parquet format data and specify the FORMAT as
parquetLOAD LABEL example_db.label4
(
DATA INFILE("hdfs://host:port/input/file")
INTO TABLE `my_table`
FORMAT AS "parquet"
(k1, k2, k3)
)
with HDFS
(
"fs.defaultFS"="hdfs://host:port",
"hadoop.username" = "user"
);
The default method is to determine by file extension.
Import the data and extract the partition field from the file path
LOAD LABEL example_db.label10
(
    DATA INFILE("hdfs://host:port/input/city=beijing/*/*")
    INTO TABLE `my_table`
    FORMAT AS "csv"
    (k1, k2, k3)
    COLUMNS FROM PATH AS (city, utc_date)
)
with HDFS
(
  "fs.defaultFS"="hdfs://host:port",
  "hadoop.username" = "user"
);
The columns in the my_table are k1, k2, k3, city, and utc_date.
The directory hdfs://hdfs_host:hdfs_port/user/doris/data/input/dir/city=beijing contains the following files:
hdfs://hdfs_host:hdfs_port/input/city=beijing/utc_date=2020-10-01/0000.csv
hdfs://hdfs_host:hdfs_port/input/city=beijing/utc_date=2020-10-02/0000.csv
hdfs://hdfs_host:hdfs_port/input/city=tianji/utc_date=2020-10-03/0000.csv
hdfs://hdfs_host:hdfs_port/input/city=tianji/utc_date=2020-10-04/0000.csv
The file only contains three columns of data:k1,k2, and k3. The other two columns,city and utc_date, will be extracted from the file path.
Filter the imported data
LOAD LABEL example_db.label6
(
    DATA INFILE("hdfs://host:port/input/file")
    INTO TABLE `my_table`
    (k1, k2, k3)
    SET (
        k2 = k2 + 1
    )
    PRECEDING FILTER k1 = 1
    WHERE k1 > k2
)
with HDFS
(
  "fs.defaultFS"="hdfs://host:port",
  "hadoop.username" = "user"
);
Only the rows where k1 = 1 in the original data and k1 > k2 after transformation will be imported.
Import data and extract the time partition field from the file path.
LOAD LABEL example_db.label7
(
    DATA INFILE("hdfs://host:port/user/data/*/test.txt")
    INTO TABLE `tbl12`
    COLUMNS TERMINATED BY ","
    (k2,k3)
    COLUMNS FROM PATH AS (data_time)
    SET (
        data_time=str_to_date(data_time, '%Y-%m-%d %H%%3A%i%%3A%s')
    )
)
with HDFS
(
  "fs.defaultFS"="hdfs://host:port",
  "hadoop.username" = "user"
);
The time contains "%3A". In HDFS paths, colons ":" are not allowed, so all colons are replaced with "%3A".
There are the following files under the path:
/user/data/data_time=2020-02-17 00%3A00%3A00/test.txt
/user/data/data_time=2020-02-18 00%3A00%3A00/test.txt
The table structure is as follows:
data_time DATETIME,
k2        INT,
k3        INT
Use Merge mode for import
LOAD LABEL example_db.label8
(
    MERGE DATA INFILE("hdfs://host:port/input/file")
    INTO TABLE `my_table`
    (k1, k2, k3, v2, v1)
    DELETE ON v2 > 100
)
with HDFS
(
  "fs.defaultFS"="hdfs://host:port",
  "hadoop.username"="user"
)
PROPERTIES
(
    "timeout" = "3600",
    "max_filter_ratio" = "0.1"
);
To use Merge mode for import, the "my_table" must be a Unique Key table. When the value of the "v2" column in the imported data is greater than 100, that row will be considered a deletion row. The timeout for the import task is 3600 seconds, and an error rate of up to 10% is allowed.
Specify the "source_sequence" column during import to ensure the order of replacements.
LOAD LABEL example_db.label9
(
    DATA INFILE("hdfs://host:port/input/file")
    INTO TABLE `my_table`
    COLUMNS TERMINATED BY ","
    (k1,k2,source_sequence,v1,v2)
    ORDER BY source_sequence
)
with HDFS
(
  "fs.defaultFS"="hdfs://host:port",
  "hadoop.username"="user"
);
The "my_table" must be a Unique Key model table and have a specified Sequence column. The data will maintain its order based on the values in the "source_sequence" column in the source data.
Import the specified file format as
json, and specify thejson_rootand jsonpaths accordingly.LOAD LABEL example_db.label10
(
DATA INFILE("hdfs://host:port/input/file.json")
INTO TABLE `my_table`
FORMAT AS "json"
PROPERTIES(
"json_root" = "$.item",
"jsonpaths" = "[$.id, $.city, $.code]"
)
)
with HDFS
(
"fs.defaultFS"="hdfs://host:port",
"hadoop.username"="user"
);
The jsonpaths can also be used in conjunction with the column list and SET (column_mapping) :
LOAD LABEL example_db.label10
(
    DATA INFILE("hdfs://host:port/input/file.json")
    INTO TABLE `my_table`
    FORMAT AS "json"
    (id, code, city)
    SET (id = id * 10)
    PROPERTIES(
      "json_root" = "$.item",
      "jsonpaths" = "[$.id, $.code, $.city]"
    )
)
with HDFS
(
  "fs.defaultFS"="hdfs://host:port",
  "hadoop.username"="user"
);
S3 Load
Doris supports importing data directly from object storage systems that support the S3 protocol through the S3 protocol. Here, we mainly introduce how to import data stored in AWS S3. For importing data from other object storage systems that support the S3 protocol, you can refer to the steps for AWS S3.
Preparation
AK and SK: First, you need to find or regenerate your AWS
Access Keys. You can find instructions on how to generate them in the AWS console underMy Security Credentials.REGION and ENDPOINT: The REGION can be selected when creating a bucket or viewed in the bucket list. The S3 ENDPOINT for each REGION can be found in the AWS documentation.
Import example
    LOAD LABEL example_db.exmpale_label_1
    (
        DATA INFILE("s3://your_bucket_name/your_file.txt")
        INTO TABLE load_test
        COLUMNS TERMINATED BY ","
    )
    WITH S3
    (
        "AWS_ENDPOINT" = "AWS_ENDPOINT",
        "AWS_ACCESS_KEY" = "AWS_ACCESS_KEY",
        "AWS_SECRET_KEY"="AWS_SECRET_KEY",
        "AWS_REGION" = "AWS_REGION"
    )
    PROPERTIES
    (
        "timeout" = "3600"
    );
Common Issues
The S3 SDK defaults to using the virtual-hosted style method for accessing objects. However, some object storage systems may not have enabled or supported the virtual-hosted style access. In such cases, we can add the
use_path_styleparameter to force the use of the path style method:WITH S3
(
"AWS_ENDPOINT" = "AWS_ENDPOINT",
"AWS_ACCESS_KEY" = "AWS_ACCESS_KEY",
"AWS_SECRET_KEY"="AWS_SECRET_KEY",
"AWS_REGION" = "AWS_REGION",
"use_path_style" = "true"
)Support for accessing all object storage systems that support the S3 protocol using temporary credentials (TOKEN) is available. The usage is as follows:
  WITH S3
  (
        "AWS_ENDPOINT" = "AWS_ENDPOINT",
        "AWS_ACCESS_KEY" = "AWS_TEMP_ACCESS_KEY",
        "AWS_SECRET_KEY" = "AWS_TEMP_SECRET_KEY",
        "AWS_TOKEN" = "AWS_TEMP_TOKEN",
        "AWS_REGION" = "AWS_REGION"
  )
Importing Data Using Other Brokers
The Broker for other remote storage systems is an optional process in the Doris cluster, primarily used to support Doris in reading and writing files and directories on remote storage. Currently, the following storage system Broker implementations are provided:
Alibaba Cloud OSS
Baidu Cloud BOS
Tencent Cloud CHDFS
Tencent Cloud GFS
Huawei Cloud OBS
JuiceFS
Google Cloud Storage (GCS)
The Broker provides services through an RPC service port and operates as a stateless Java process. Its primary responsibility is to encapsulate POSIX-like file operations for remote storage, such as open, pread, pwrite, and more. Additionally, the Broker does not keep track of any other information, which means that all the connection details, file information, and permission details related to the remote storage must be passed to the Broker process through parameters during RPC calls. This ensures that the Broker can correctly read and write files.
The Broker serves solely as a data pathway and does not involve any computational tasks, thus requiring minimal memory usage. Typically, a Doris system would deploy one or more Broker processes. Furthermore, Brokers of the same type are grouped together and assigned a unique name (Broker name).
This section primarily focuses on the parameters required by the Broker when accessing different remote storage systems, such as connection information, authentication details, and more. Understanding and correctly configuring these parameters is crucial for successful and secure data exchange between Doris and the remote storage systems.
Broker Information
The information of the Broker consists of two parts: the name (Broker name) and the authentication information. The usual syntax format is as follows:
WITH BROKER "broker_name"
(
    "username" = "xxx",
    "password" = "yyy",
    "other_prop" = "prop_value",
    ...
);
Broker Name
Typically, users need to specify an existing Broker Name through the WITH BROKER "broker_name" clause in the operation command. The Broker Name is a name designated by the user when adding a Broker process through the ALTER SYSTEM ADD BROKER command. One name usually corresponds to one or more Broker processes. Doris will select an available Broker process based on the name. Users can view the Brokers that currently exist in the cluster through the SHOW BROKER command.
The Broker Name is merely a user-defined name and does not represent the type of Broker.
Authentication Information
Different Broker types and access methods require different authentication information. The authentication information is usually provided in the Property Map in a Key-Value format after WITH BROKER "broker_name".
Broker Examples
Alibaba Cloud OSS
(
    "fs.oss.accessKeyId" = "",
    "fs.oss.accessKeySecret" = "",
    "fs.oss.endpoint" = ""
)
JuiceFS
(
    "fs.defaultFS" = "jfs://xxx/",
    "fs.jfs.impl" = "io.juicefs.JuiceFileSystem",
    "fs.AbstractFileSystem.jfs.impl" = "io.juicefs.JuiceFS",
    "juicefs.meta" = "xxx",
    "juicefs.access-log" = "xxx"
)
GCS
When using a Broker to access GCS, the Project ID is required, while other parameters are optional. Please refer to the GCS Config for all parameter configurations.
(
    "fs.gs.project.id" = "Your Project ID",
    "fs.AbstractFileSystem.gs.impl" = "com.google.cloud.hadoop.fs.gcs.GoogleHadoopFS",
    "fs.gs.impl" = "com.google.cloud.hadoop.fs.gcs.GoogleHadoopFileSystem",
)
Related Configurations
The following configurations belong to the system-level settings for Broker load, which affect all Broker load import tasks. These configurations can be adjusted by modifying the fe.conf file.
min_bytes_per_broker_scanner
Default: 64MB.
The minimum amount of data processed by a single BE in a Broker Load job.
max_bytes_per_broker_scanner
Default: 500GB.
The maximum amount of data processed by a single BE in a Broker Load job.
Typically, the maximum supported data volume for an import job is max_bytes_per_broker_scanner * the number of BE nodes. If you need to import a larger volume of data, you may need to adjust the size of the max_bytes_per_broker_scanner parameter appropriately.
max_broker_concurrency
Default: 10.
Limits the maximum concurrency of imports for a job.
The minimum processed data volume, maximum concurrency, size of the source file, and the current number of BE nodes jointly determine the concurrency of this import.
Import Concurrency = Math.min(Source File Size / Minimum Processing Amount, Maximum Concurrency, Current Number of BE Nodes)
Processing Volume per BE for this Import = Source File Size / Import Concurrency
Common Issues
1. Import Error: Scan bytes per broker scanner exceed limit:xxx
Please refer to the best practices section in the documentation and modify the FE configuration items max_bytes_per_broker_scanner and max_broker_concurrency.
2. Import Error: : failed to send batch or TabletWriter add batch with unknown id
Appropriately adjust the query_timeout and streaming_load_rpc_max_alive_time_sec settings.
3. Import Error: LOAD_RUN_FAIL; msg:Invalid Column Name:xxx
For PARQUET or ORC format data, the column names in the file header must match the column names in the Doris table. For example:
(tmp_c1,tmp_c2)
SET
(
    id=tmp_c2,
    name=tmp_c1
)
This represents fetching columns named (tmp_c1, tmp_c2) in the parquet or orc file and mapping them to the (id, name) columns in the Doris table. If no set is specified, the columns in the file header will be used for mapping.
If ORC files are generated directly using certain Hive versions, the column headers in the ORC file may not be the Hive metadata, but (_col0, _col1, _col2, ...), which may lead to the Invalid Column Name error. In this case, mapping using SET is necessary.
5. Import Error: Failed to get S3 FileSystem for bucket is null/empty
The bucket information is incorrect or does not exist. Or the bucket format is not supported. When creating a bucket name with an underscore using GCS, such as s3://gs_bucket/load_tbl, the S3 Client may report an error when accessing GCS. It is recommended not to use underscores when creating bucket paths.
6. Import Timeout
The default timeout for imports is 4 hours. If a timeout occurs, it is not recommended to directly increase the maximum import timeout to solve the problem. If the single import time exceeds the default import timeout of 4 hours, it is best to split the file to be imported and perform multiple imports to solve the problem. Setting an excessively long timeout time can lead to high costs for retrying failed imports.
You can calculate the expected maximum import file data volume for the Doris cluster using the following formula:
Expected Maximum Import File Data Volume = 14400s 10M/s Number of BEs
For example, if the cluster has 10 BEs:
Expected Maximum Import File Data Volume = 14400s 10M/s 10 = 1440000M ≈ 1440G
In general, user environments may not reach speeds of 10M/s, so it is recommended to split files exceeding 500G before importing.
More Help
For more detailed syntax and best practices for using Broker Load , please refer to the Broker Load command manual. You can also enter HELP BROKER LOAD in the MySQL client command line to obtain more help information.